This Linux commands cheat sheet should be extremely useful for anyone who is new to this style of operating system. It refers to most commands that a beginner will find handy, however it doesn’t include hugely detailed information regarding each command to help keep things brief.
This cheat sheet should prove useful to more than just Raspberry Pi users and is pretty important for anyone who wants to learn what they’re actually plugging into their Linux based terminal.
I hope that the information below is detailed enough for you to understand the basics of what the commands do. With almost every command there is a lot more advanced options that you’re able to use to help achieve the task you’re trying to do.
If you need more information simply check out the link associated with some of the more complex commands alternatively you can check out the manual page within Linux itself.
If you want to learn more about the Raspberry Pi and all the cool things you can do with it then be sure to check out my
many cool Pi projects, guides and much more. I’m constantly adding more so be sure drop a follow over at any of the major social networks.
General Commands
The following commands don’t really fall into a specific group but are extremely handy to refer to when working out what is the best command to use to achieve the task you’re wishing to do. For example the man command will bring up tons of useful information on almost any command.
MAN
Man is short for manual and is used to call the manual page for a command. It’s extremely useful when it comes to finding out what a specific command does and any additional options that may available to use with that command. You’re able to run man man to view the manual page of the man command.
Example:
man man
man ls
PIPES
A pipe is an incredibly useful shortcut that can be used to use the output of one command into another command. The pipe symbol is a vertical line | and is used in-between two commands. The output of the first command is then directed into the second.
For example, to only show the first 10 entries of the ls command it can be piped through the head command ls | head
Example:
ls | head
File System
The Linux commands below are related to the file system of the operating system so this includes things that are file related such as copying, moving, deleting, editing, permissions, unzipping and much more.
There are a few directory shortcuts that you should be aware of before you start looking at some of the following commands.
By placing a dot in front of the slash like this ./ will mean you’re referring the current directory. Adding two dots in front of the slash like this ../ means you’re referring to the parent directory.
The tilde symbol ~ refers to the home directory, this is handy whenever you need to quickly refer to a file in the home directory or navigate to a file from the home directory.
Examples:
./
../
/~
LS
This command will list the contents of the current directory or the one that you have specified: ls /home/pi). The -lflag can be used to display more information about the contents of the directory such as permissions, owner, group, size, date and the time-stamp of the last edit. The information will display in a list format.
Examples:
ls /home/pi
ls -l /home/pi
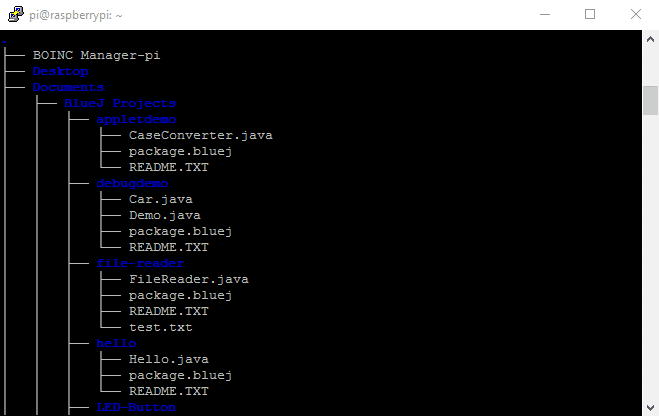
TREE
The tree command will display a directory, all the sub-directories and files indented as a file structure.
Example:
tree
CD
This is a very simple yet a very important command as it will allow you to change directories. There are several things to be aware of when typing in the directory you wish to change to which I mentioned above.
Examples:
cd /directory
cd ..
PWD
The PWD command simply outputs the name of the current directory. PWD is short for print working directory.
Example:
pwd
MKDIR
This command will create a new directory in the location that you specify. For example, mkdir newDirectoryName will make a new directory in the current directory while mkdir /home/newDirectoryName would make a new directory in the home folder.
Example:
mkdir newDirectoryName
RMDIR
RMDIR will remove empty directories, it’s important that you make sure the directory is empty when you go to remove it otherwise you will get an error.
Example:
rmdir directoryYouWishToRemove
RM
Removes the specified file or directory. Alternatively you can use –r to recursively remove files and directories.
Note: RM doesn’t truly delete your files but instead un-links them from the file system and marks it as available space. Use shred if you want to completely erase the data. RM will still make restoring a file extremely hard so use carefully.
Example:
rm file
CP
CP will create a copy of a file in the specified location. You’re able to use the -r flag to recursively copy the contents of a directory.
Example:
cp file newfilename
MV
MV moves a file and places it at the specified location. You can use –r flag to recursively copy the contents of directories. This is similar to cp but moves a file rather than copies the file.
Example:
mv file.txt ./newdirectory
TOUCH
Touch can either set the last modified time stamp of the specified file(s) or creates one if it doesn’t exist.
Example:
touch file.txt
CAT
Cat is short for catenate and will list the contents of files. For examplem cat thisFile.txt will display the contents inside of this file. You can also use this to output the contents of multiple files. For example, cat *.txt will list the contents of all of the .txt files in the current directory.
Examples:
cat file.txt
cat file.txt file.txt
cat *.txt
HEAD
Head will display the beginning of a file, it can be used with –n to specify the number of lines to show. The default is 10 lines.
Examples:
head file.txt
head file.txt -n 20
TAIL
Tail will display the end of a file, it can be used with –n to specify the number of lines to show. The default is 10 lines.
Examples:
tail file.txt
tail file.txt -n 20
CHMOD
CHMOD is typically used to alter the permissions of a file or files. The chmod can use symbols or numbers depending on what you prefer.
For example the symbols are u (user), g (group), o (other users), r (read), w (write) and lately x (execute). An example of this is chmod u+x file will add execute permissions for the owner of the file.
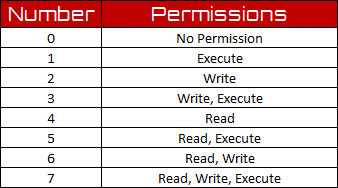
If you’re using numbers then refer to the diagram above for which number to use for the permissions. The order of the numbers should be as followed owner, group and then others, Eg.
cmod 777 file will give full permissions to the user, group and others.
Examples:chmod 754 file
chmod u=rw file
CHOWN
CHOWN will change the user and/or the group that owns a file. It normally needs to be run as root by either running in sudo su or just appending sudo in front of the command. For example sudo chown pi:root file will change the owner to pi and the group to root.
Example:
sudo chown pi:root file
DD
DD will copy files as well as convert the files as specified. It is commonly used to copy an entire disk to a single file. For example dd if=/dev/sdd of=backup.img will create a backup image of a SD card or USB drive located /dev/sdd. Make sure to use the correct drive when restoring an image (dd if=backup.img of=/dev/sdd) as it can overwrite/wipe the entire disk.
Examples:
dd if=/dev/sdd of=backup.img
dd if=backup.img of=/dev/sdd
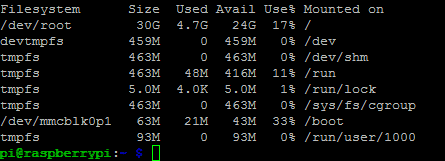
DF
DF will display the disk space available and used on the current mounted file systems. You can use the -h flag(df -h) to see the output in a human readable format using M for megabytes rather than showing the number of bytes.
Examples:
df
df -h
UNZIP
Unzip will extract the files and directories from a compressed zip archive.
Example:
unzip archive.zip
TAR
Tar can be used to both compress and extract the contents of an archive in the tar format. To create a compressed file use the -c flag. tar -cvzf archive.tar.gz directory. In order to extract the contents of a tar archive you need to use the -x flag. tar -xvzf filename.tar.gz
Examples:
tar -cvzf archive.tar.gz directory
tar -xvzf archive.tar.gz
WGET
Wget stands for web get and is used to download files from the web directly to the computer. For example wget http://example.com/file.txt will download file.txt straight into the current directory.
Example:
wget http://example.com/file.txt
Searching
The next commands in this Linux commands cheat search are for searching/finding directories and files. These are extremely useful for when you’re trying to find something that is not its usual location.
GREP
GREP stands for global regular express print and is used to search inside files for certain search patterns. For example grep "search" *.txt will search in all the text files that are in the current directory for the string “search”.
GREP also supports regular expressions which allows special letter combinations to be included in the search.
Example:
grep "search" *.txt
grep "Pi.*Life Up" *.txt
FIND
Find will search for directories and files that match a specific pattern. There are a lot of different combinations that can be used to help extend the accuracy of this command. It can be piped with other commands such as GREP to again improve the search.
Example:
find . -name 'help'
WHEREIS
Whereis will display the documentation, binaries and the source files of a specific command. It will look through standard program locations until it finds the requested command.
Example:
whereis grep
Networking
The following commands are related to networking and can be used for diagnostics when it comes to working out network related issues or just for information gathering. Again these are pretty important for anyone who is new to Linux thus why I have included them in this Linux commands cheat sheet.
PING
The ping utility is typically used to check if communication can be made with another host. It can simply be be used with the default settings by just specifying a hostname (e.g. ping pimylifeup.com) or an IP address (e.g. ping 8.8.8.8).
Examples:
ping pimylifeup.com
ping 8.8.8.8
HOSTNAME
Hostname will display the current host name of the system. A privileged (super) user can set the hostname to a new one by supplying it as an argument (sudo hostname newName). The -I flag can be used to instead show the IP for the host.
Examples:
hostname
hostname -I
sudo hostname newName
IFCONFIG
Ifconfig displays the network configuration details for the interfaces on the current system when it is run without any arguments. By supplying the command with the name of an interface (e.g. eth0 or lo) you can see the configuration for that specific interface. You can also configure interfaces and also set them to up or down. It’s best to refer to the manual pages for more information on how to do this.
Example:
ifconfig
ifconfig eth0
SSH
SSH or also known as secure shell will allow you to connect to another computer using an encrypted network connection. This is how we normally
connect to the Pi remotely using the tool known as Putty.
Example:ssh user@IP_Address
SCP
SCP is short for secure copy and is very similar to the cp command but instead copies files from one computer to another using ssh. You will be prompted for a password before the transfer will begin.
Example:
scp /home/bob/*.jpg gus@example.com:/home/gus/archive
scp gus@example.com:/home/gus/archive/*.jpg /home/bob
Process Management
Process management just like any operating system is extremely important. The commands below will help you diagnose, monitor and kill processes if required. If you need more information then please refer to the manual pages.
PS
PS will provide a snapshot of the processes currently running on your linux-based operating system. There are a ton of options that you’re able to use with this command so if you need more information simply use man to get all the details.
Example:
ps
TOP
Top can be used to see real time information on the processes that are currently running. Much like the ps command there is a ton of additional options you’re able to use with this command.
Example:
top
KILL
This grim sounding command is used to terminate a process or processes. It’s extremely handy when you find yourself with a process that won’t terminate and/or is frozen. There are a few variations on this command that you’re able to use. See the examples below to get a good idea of how you can use this command.
Examples:
#Kill process with id pid (pid is process id)
kill pid

#Kill the process with matching name
pkill name

#Kill all processes with the matching name
killall name
Users
These commands are mostly useful for anyone who is running multiple users on the same operating system. They’re typically used by system administrators to be able add, delete and view the users and what they may be doing.
ID
Id is used to print the ids of the current users and groups. This is extremely handy when it comes to setting permissions to a specific group or user where the id number is required. The -g option will print the group id whilst the -u will print the user id.
Examples:
id
id -u pi
id -g pi
WHO
The who command will list all the users that are currently logged in and any other useful information about the logged in users.
Example:
who
LAST
Last shows a list of users who have recently been logged in. It basically searches through the file located at /var/log/wtmp
Example:
last
GROUPADD
Groupadd will do exactly as it sounds, it will create a new group with the options that you give it. You will need to be logged in as root for this command to work correctly.
Example:
groupadd gus
USERADD
Useradd will again do exactly as it sounds and create a new user. When you create a new user you will need to use passwd to assign a password to that account before it’s able to be used. Again you will need to have superuser rights or logged in as root for this to work.
Example:
useradd gus
USERDEL
Userdel will do exactly as you would expect it to, delete a users account. It’s also extremely important to note that it will also delete all the associated files to do with that user. If this sounds a little heavy handed then deluser might be a better alternative as it won’t remove the home directory unless you use the –remove-home option. As you would expect both these commands need superuser rights.
Examples:
userdel gus
deluser gus
USERMOD
Usermod is used to modify a user account. There are a ton of options that you’re able to use to make the changes. For example -d will allow you to alter the home directory of the user. Again you will need to be a superuser to be able to make any changes.
Example:
usermod -d /home/gusNewDirectory gus
PASSWD
One of the most important commands to know is passwd as this will allow you to change your password or a password of another user. (If you’re a super user)
Examples:
passwd
passwd gus
There is always more commands but hopefully this Linux commands cheat sheet has covered all the important ones. If you’re just starting out with the Pi and want more information then be sure to check out the handy section on
getting started with the Pi.
If you want a cool downloadable version of this Linux cheat sheet then you can
download it right here. Again much like this article if you notice a problem then be sure to leave a comment below.
If you feel like I have missed some commands that are important to beginners and advanced users then be sure to leave a comment below.